
One of the biggest mistakes Flutter developers make is mixing business logic with UI code, especially when handling input validations. It’s tempting to place validation logic directly inside widgets, but this approach violates clean architecture principles and makes your app harder to maintain/test.
Instead, separating the presentation layer (UI) from the business logic ensures scalability, testability, and cleaner code. In this guide, we’ll explore the right way to handle input validations or BLoC validations in Flutter, making your app more efficient and maintainable. 🚀
What You’ll Learn in This Guide 📖
- Flutter BLoC input validations with Clean Code Architecture
- Separating UI and Business logic
- Best practices for error handling with user input
- No StreamBuilders, No Streams, No over engineered code.
Table of Contents
Step 1: Add flutter_bloc package
flutter pub add flutter_blocAs of now I am using 9.0.0 version of flutter_bloc.
Step 2: Create BLoC Directory Structure
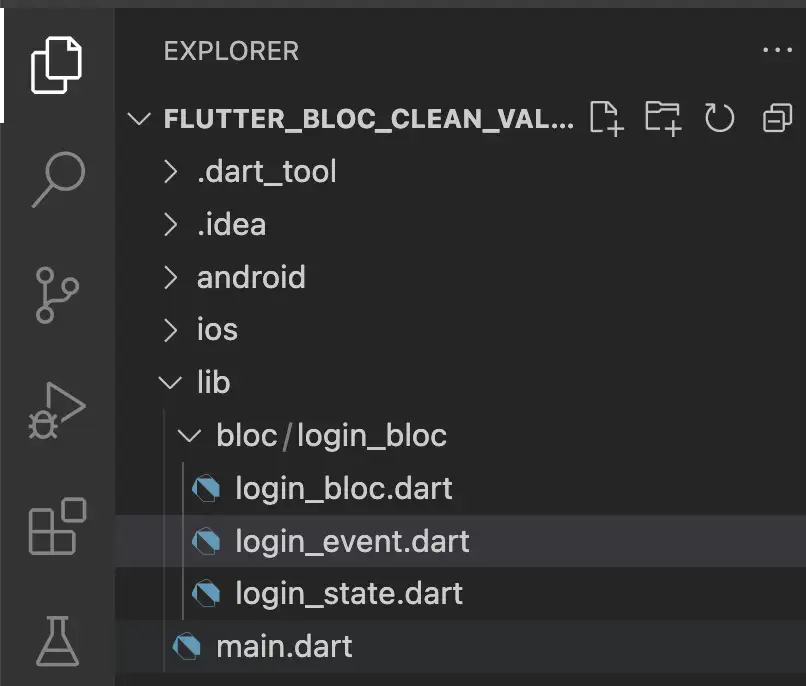
With every bloc you should create 3 files as seen above.
- login_bloc.dart: Will handle the business logic for your input validations.
- login_event.dart: Will act as a bridge between your Widgets(UI) and business logic.
- login_state.dart: Will define predictable/declarative states(with data), your UI can handle.
Step 3: Setup LoginState
This will hold the data and associated states which your UI can handle. The best thing about BLoC is that it makes your UI predictable and there is no if-but condition which could lead to an unexpected result. You are in control of what n number of things will happen in the widget’s lifecycle. Add the below code to you login_state.dart file.
class LoginState {
  final String email;
  final String password;
  final String? emailError;
  final String? passwordError;
  final bool isSubmitting;

  const LoginState({
    this.email = '',
    this.password = '',
    this.emailError,
    this.passwordError,
    this.isSubmitting = false,
  });

  bool get isValid => emailError == null &&
                      passwordError == null &&
                      email.isNotEmpty &&
                      password.isNotEmpty;

  LoginState copyWith({
    String? email,
    String? password,
    String? emailError,
    String? passwordError,
    bool? isSubmitting,
  }) {
    return LoginState(
      email: email ?? this.email,
      password: password ?? this.password,
      emailError: emailError, //Mind the difference of how this is set as compared to others
      passwordError: passwordError, //Same as above
      isSubmitting: isSubmitting ?? this.isSubmitting,
    );
  }
}
class LoginSuccess extends LoginState{
  LoginSuccess(): super(isSubmitting: false);
}
The LoginState class is an immutable representation of the login form’s state. It holds essential data such as email, password, validation errors, and submission status.
Key features of this state class:
- Input Validations Logic: The
isValidgetter ensures the form is valid based on empty and error message checks. - State Copying: The
copyWithmethod allows partial state updates without modifying other fields, ensuring better state management.
Additionally, we define a LoginSuccess class extending LoginState, which represents a successful login state. This ensures that after a successful login, the UI receives a distinct state update while maintaining immutability.
Let’s see if you can figure out why emailError and passwordError does not have null checks in the copyWith implementation. If not, comment below and I’ll explain 🤓.
A state must be immutable in Flutter to trigger UI updates correctly. Since Flutter rebuilds widgets based on state changes, creating a new instance(we used copyWith in this example) ensures the framework detects modifications and efficiently updates the UI. This concept is one of the building blocks of clean architecture in flutter.
The copyWith method allows us to create a new instance of a state while selectively modifying specific fields. This will be helpful in our validations logic, let’s move ahead and see how.
Step 4: Setup LoginEvent
Let’s handle the events which will be triggered from the UI for validating user input. Add the below code to you login_state.dart file.
abstract class LoginEvent {}

class EmailChanged extends LoginEvent {
  final String email;
  EmailChanged(this.email);
}

class PasswordChanged extends LoginEvent {
  final String password;
  PasswordChanged(this.password);
}

class LoginSubmitted extends LoginEvent {}
Here we define all the predictable actions which can happen in your Widget’s lifecycle with respect to the business logic.
EmailChangedwill be triggered when the user is typing the email addressPasswordChangedwill be triggered when the user is typing the passwordLoginSubmittedwill be triggered when the user taps on the Login button.
If you are interested in writing clean code, do check this post on Mixin concept of flutter and how it enables you to write production quality reusable code.
Step 5: Setup LoginBloc
This should handle your events and states. Let’s see step-by-step. Add this code to you login_state.dart file
class LoginBloc extends Bloc<LoginEvent, LoginState> {
  LoginBloc() : super(const LoginState()) {
    on<EmailChanged>(_onEmailChanged);
    on<PasswordChanged>(_onPasswordChanged);
    on<LoginSubmitted>(_onSubmitted);
  }
....
In this class, we handle all 3 possible events which could originate from the UI. EmailChanged, PasswordChanged and LoginSubmitted.
Let’s handle the input validations now in the same class. Place this code right after above snippet but in the same class. If you are having trouble adding it, just check the Github link at the bottom for full code snippet.
void _onEmailChanged(EmailChanged event, Emitter<LoginState> emit) {
    final email = event.email;
    String? error;

    if (email.isEmpty) {
      error = 'Email is required';
    } else if (!RegExp(r"^[a-zA-Z0-9._%+-]+@[a-zA-Z0-9.-]+\.[a-zA-Z]{2,}$")
        .hasMatch(email)) {
      error = 'Enter a valid email';
    }

    emit(state.copyWith(
      email: email,
      emailError: error,
      passwordError: state.passwordError
    ));
  }

  void _onPasswordChanged(PasswordChanged event, Emitter<LoginState> emit) {
    final password = event.password;
    String? error;

    if (password.isEmpty) {
      error = 'Password is required';
    } else if (password.length < 5) {
      error = 'Password must be at least 5 characters';
    }

    emit(state.copyWith(
      password: password,
      passwordError: error,
      emailError: state.emailError
    ));
  }
Input validations logic is pretty simple but the main juice of input validations and state immutability lies in the “emit” call.
Immutable State Management: Instead of modifying the existing state, we create a new instance with the updated values.
Selective Updates: We only update email and emailError, while keeping/preserving the passwordError unchanged by explicitly passing state.passwordError. This prevents unwanted resets or overrides of other state fields.
Efficient UI Updates: Since a new state object is emitted, Flutter’s BlocListener or BlocBuilder detects changes and triggers UI rebuilds.
Let’s handle the LoginSubmitted event now.
Future<void> _onSubmitted(LoginSubmitted event, Emitter<LoginState> emit) async {
    if (!state.isValid) return;

    emit(state.copyWith(isSubmitting: true));

    try {
      await Future.delayed(const Duration(seconds: 1)); // Simulated API call

       emit(LoginSuccess());
    } catch (e) {
      emit(state.copyWith(isSubmitting: false));
    }
  }
We set isSubmitting to true while using the same notion of copyWith. Added a simulated delay as if we were making an API call. Finally emitting LoginSuccess state to stop the loader and show a dialog in the BlocListener.
Step 6: Bake the UI
Final piece of the puzzle, the shiny UI 🥳. This is probably the easiest part where we need to focus on:
- “onChanged” of the textfields.
- “errorText” of the TextField’s decoration property.
- “BlocConsumer” handling LoginSuccess.
Add this to your main.dart file.
void main() {
  runApp(const MyApp());
}

class MyApp extends StatelessWidget {
  const MyApp({super.key});

  // This widget is the root of your application.
  @override
  Widget build(BuildContext context) {
    return MaterialApp(
      title: 'Flutter BLoC Input Validations',
      theme: ThemeData(
        colorScheme: ColorScheme.fromSeed(seedColor: Colors.deepPurple),
        useMaterial3: true,
      ),
      home: BlocProvider<LoginBloc>( //.....#1
        create: (context) => LoginBloc(),
        child: const LoginPage(),
      ),
    );
  }
}

class LoginPage extends StatelessWidget {
  const LoginPage({super.key});

  @override
  Widget build(BuildContext context) {
    return Scaffold(
      backgroundColor: Colors.white,
      body: BlocConsumer<LoginBloc, LoginState>( //.....#2
        listener: (context, state) {
          if (state is LoginSuccess) {
            showDialog(context: context, builder: (_){
              return AlertDialog(
                title: const Text('Success'),
                content: const Text('You are logged in !'),
                actions: [
                  TextButton(onPressed: (){
                    Navigator.pop(context);
                    Navigator.pushReplacement(context, MaterialPageRoute(
                      builder: (context) => HomePage()));
                      },
                      child: const Text('OK')
                      )
                ],
              );
            });
          }
        },
        builder: (context, state) {
          return SingleChildScrollView(
            physics: const BouncingScrollPhysics(),
            child: Padding(
              padding: const EdgeInsets.all(30.0),
              child: Column(
                children: [
                  const SizedBox(height: 200),
                  const Text(
                    "Welcome to BLoC Company",
                    style: TextStyle(fontSize: 40),
                  ),
                  const SizedBox(height: 50),
                  const Text(
                    "Please login to continue",
                    style: TextStyle(fontSize: 20)
                  ),
                  const SizedBox(height: 20),
                  TextField(
                    decoration: InputDecoration(
                      border: const OutlineInputBorder(),
                      hintText: 'Email',
                      errorText: state.emailError, //.....#4
                    ),
                    keyboardType: TextInputType.emailAddress,
                    textInputAction: TextInputAction.next,
                    onChanged: (value) => context.read<LoginBloc>()
                        .add(EmailChanged(value)), //.....#3
                  ),
                  const SizedBox(height: 10),
                  TextField(
                    decoration: InputDecoration(
                      border: const OutlineInputBorder(),
                      hintText: 'Password',
                      errorText: state.passwordError,
                    ),
                    obscureText: true,
                    onChanged: (value) => context.read<LoginBloc>()
                        .add(PasswordChanged(value)),
                  ),
                  const SizedBox(height: 20),
                  ElevatedButton(
                    onPressed: state.isValid && !state.isSubmitting
                        ? () => context.read<LoginBloc>().add(LoginSubmitted())
                        : null,
                    child: state.isSubmitting
                        ? const CircularProgressIndicator()
                        : const Text('Login'),
                  ),
                  const SizedBox(height: 20),
                  const Text(
                    "By signing in you agree to the terms and conditions"
                  ),
                ],
              ),
            ),
          );
        },
      ),
    );
  }
}

class HomePage extends StatelessWidget {
  @override
  Widget build(BuildContext context) {
   return Scaffold(
    appBar: AppBar(
      title: Text("Hey there 👋🏻!"),
    ),
    body: Container(
      child: Center(
        child: Text('Welcome'))
    ),
   );
  }
}
Let’s look at the inline comments one by one.
- We wrap the LoginPage with BlocProvider
- We use a BlocConsumer for listening to the state changes and building the widget’s UI.
- listener: Use this to handle the state defects like handling error/success messages on state changes
- builder: Use this to rebuild your UI on state changes.
- Trigger LoginBloc’s EmailChanged event using the
context.read<LoginBloc>().add(EmailChanged(value)). This is how to trigger input validations. - Update the error text for textfield’s decoration property based on state.emailError or state.passwordError.


